Wednesday, May 20, 2009

Bull Gears - Part 2


Once the sides of the gear blank were machined to size, the gear blank was clamped to the table of a Bridgeport milling machine. The original dowel pin hole was used to find the center of the gear blank and the digital readout (DRO) was zeroed for both axis.  Using x-y coordinates, the location of the eight mounting holes were found and drilled. A special block was machined to mount to the top of the rotary table via the “T” slots in the top of the table. This block had a ½” diameter dowel pin in the center and 8 corresponding tapped holes to bolt the gear blank firmly in place. A large 4-flute end mill was used to machine the blank to the appropriate outside diameter for the gear tooth cutting process.


The actual gear tooth cutting process is not black magic nor should it scare you from trying it. There are cutters that have the exact shape that is needed for any given pitch diameter and tooth size. They are called “involute” gear cutters. . An involute cutter cuts the root of the gear tooth and the sides of adjacent gear teeth. The main concern is not to cut too much metal at one time.


The K&T was set up as a typical horizontal milling machine and the rotary table was disconnected from the power feed. An indexing plate assembly was mounted to the rotary table so the gear blank could be rotated in precise increments. A 1/8” wide slitting saw was used to remove a major part of the material where the root of the tooth would be. This lessens the amount of material that the gear cutter has to remove. Two passes were made with the gear cutter to reach the desired depth and profile. The K&T has a power feed on the knee. So I would index, flip the power feed lever to up, the stop would trip the power feed handle out. Then I would rapid traverse the knee down and start the process all over again. Meanwhile I would work at something else for the tractor. I guess you would call it multi-tasking. Believe it or not, when I finished machining the two bull gears, I almost had a full 5 gallon bucket of cast iron shavings.

Tuesday, May 19, 2009

Bull Gears - Part 1


The bull gears were the next big things that I tackled. I knew that this would be a very time consuming machining operation and that once set up could basically run on its own while I worked on other component parts for the Tractor. The bull gears have a 16” pitch diameter. My lathe will only swing a 13” diameter. So this is where I put the 55 year old Kearney and Trecker (K&T) universal horizontal milling machine to good use. When I purchased the machine several years ago, I was very fortunate to get all the attachments that went along with the machine, especially the powered rotary table. I basically turned the machine into a horizontal lathe. Instead of a tool bit, I used end mills to do the cutting. The attached pictures show some of the various processes involved. The rotary table is powered via the table power feed through a special gear box mounted on the end of the table. I made a fixture that looks somewhat like a 4-jaw chuck and mounted that to the rotary table. Before mounting the casting I found the center of the bull gear in relationship to the spokes. This is where the excess material on the OD did come into play. The gear blank was not cast symmetrically, so some concessions had to be made. I made sure one surface was relatively flat for a reference surface. Once the center was found, a hole was drilled and reamed 0.501” diameter for a locating dowel pin. I had a similar hole in my fixture that was located on the center lines of the rotary table. The gear blank was place in the fixture over the locating pin and clamped in place by the four bolts like using a four-jaw chuck. As the bolts were tighten, the locating pin was pulled in and out to make sure the gear blank was not favoring anyone particular direction in the fixture.

I proceeded to use a 2” diameter roughing end mill to remove the excess material within 0.050”- 0.060” of the finished dimensions. A ball end mill was used to make a nice fillet towards the face of the gear. A standard 4-flute end mill was used to produce the final finished surface. One picture shows how much material had to be removed from the spokes. The gear blank started out at 57 pounds. When all the machining was done, it weighs a mere 26 pounds. Why the gear blanks were cast with so much excess material, I do not know.


In any case, while the K&T was doing its thing, I was able to work on the front and rear wheel hubs.

Monday, May 18, 2009

Contractor Box


One of the early task in this build was the contractor box. I already had a preconceived image of what it was to look like from building 3 contractor boxes for my 1/4 scale CASE. So I thought this would be an easy task. When I really got into the drawings, what I was seeing was not anything like I had built before. The ¼ scale version had left out the step area for the differential gearing. So a new vision had to be developed. So I made some drawings that I could cipher and translate to flat sheet metal. I did take some liberties with the sizing. I made the overall length a little longer and I put more space between the rear wheel and the fuel bunker area. I wanted more water and fuel capacity and I wanted the extra space between the wheels and the box in case I wanted to put rubber to the rear wheels.


The entire box was made of 1/16” thick 304 stainless steel. I did not want to go through what I did with the ¼ scale CASE. They were made of steel and the first one did last me about 6 years. The second one only lasted two years before it started to leak. I had coated the inside with primer paint that never fully dried out spite my best efforts. Then the water got between the paint and the metal and sat there and rotted its way through the bottom of the box. I had pinholes by the dozens. Thus, I chose stainless steel for this build. I welded all the seams via the TIG (tungsten inert gas) method. TIG welding has a tungsten electrode that generates a plasma arc in an inert gas (argon) atmosphere at the weld area. A foot pedal controls the current going to the torch head thus controlling the size of the plasma arc. This way you can control the heat going into the weld joint. If you have a tight joint between two pieces and apply the plasma arc the metal melts and flows together very nicely without the aid of a filler rod. It makes for a beautiful joint. If you need additional metal to make the joint stronger, then filler rod may be added at the time of welding. I tell folks who watch the process that it is almost like soldering. I consider rivets to be an important part of a steam engine model. So I did incorporate rivets in the appropriate areas of my contractor box. I must say my finally way of securing the rivets in place is not what I had planned. I tried welding the rivets from the backside before assembly as I had done on my ¼ scale boxes. All that did was to warp the stainless steel panels way beyond use. I tried soldering from the outside with a small torch and a huge electric soldering iron, same results, the heat would warp the panels. So dad suggested using “superglue”. You know what, it worked very well. I put the superglue around the hole and lightly pushed the rivet in place so I would not push all the glue out of the joint. I gently wiped off the excess and after allowing sufficient time for the glue to cure, it took a hammer to pop the rivets out of their holes. The rest is history. I found some ½ round stainless bar stock that I formed and welded to the top edge of the box to stiffen up the sides and eliminate the sharp raw edge. I washed the entire box down with Dupont “Prep-Sol” to clean and degrease before painting. I used Ace Hardware house brand (Krylon) primer spray paint. I waited a good week before I painted the box a satin black. I did secure a great set of decals from “Gray Barn Machine”. The link is in a previous post. The decals and pin striping will be applied when the tractor is all completed and running. The final touch so to speak.

Sunday, May 17, 2009

Boiler Fabrication Continued


This posting shows what took place to generate the firebox. I tack welded the front and rear pieces of the firebox to a piece of channel at the appropiate distance apart. The channel was clamped very firmly to the welding table. The mid point was found on the crown sheet and tack welded in place as the picture shows. A lot of heat was applied to the crown sheet to wrap it around the outside of the front and rear pieces of the firebox. Bar clamps were used to aid in the wrapping process as well as holding the sheet in place for tack welding. There is a picture showing the bottom of the fire box and how the mud ring had to be ground to provide for a root weld and then the fillet welds. The welding process for this project entailed a root weld, fillet welds that required anywhere from 4 to 6 passes depending on the width of the weld area and then a cover weld. It was a very time consuming process, but a great challenge and the out come was most gratifying.

Thursday, May 14, 2009

Boiler Fabrication Continued


Here are some more boiler fabrication pictures. The top right picture shows the lower link pivot point with link to the lower cannon bearing. The rivets on the angle support bracket are fake as are all the rivets on the boiler. The top right picture shows the firebox installed into the outer boiler shell. The mud ring is starting to be welded. The second left picture show the bottom of the back head with the rear draft opening, clean out plugs for the mud ring area and the brackets for the lower cannon bearing spring mount brackets. The next picture down shows the boiler in its upright position with the steam dome in place.  The bottom picture shows the boiler shell with side plates, back head and throat sheet all welded in place. 

Boiler Design & Fabrication


The Boiler ! The heart and soul of any portable or traction engine. When built right and maintain properly it will give years of service. When approaching the design of a model boiler it is very important to remember that water, steam and

 thermodynamics do not scale down. There is a series of engineering calculations one must go through to determine the parameters that the boiler must be built too. Maryland has a very good section in their Boiler Codes pertaining to model boilers.

Here is the link: http://www.dsd.state.md.us/comar/09/09.12.01.33.htm This will give you an excellent over view of what is entailed in designing a model boiler.

I must say that boiler design and construction should be left to those who are experienced and have the proper welding credentials. “Pressure Vessel Quality” (PVQ) materials must be bought and used through out the boiler construction. The weld joints must be properly prepared and welded in a special manner to obtain full pentration. Bob Oliver of Oliver’s Boiler and Jonas Stutzman of Middlefield, Ohio would be excellent starting points to have a professionally build boiler made for your scale steam project.

Knowing all that I still decided to pursue building my own boiler based on my 45 years of machining and welding experience. I had already jumped through most of the hoops when I fabricated the boiler for my ¼ scale CASE.

The original boiler design for the 1/3 CASE was based on a flanged and riveted boiler. These boilers are a thing of the past and North Carolina Board of Labor would not begin to work with me on such a construction or even approve its operation. So a new boiler had to be designed for my project. I had a piece of 10” seamless pressure tested schedule 40 pipe of the right materials just begging to be used as a boiler. So with that piece of pipe and the engineering calculations I started to develop a design for my 1/3 scale CASE. I discussed my design with the NC Board of Labor Boiler Division Bureau Chief; several professional boiler makers and Bill Bondie, a federal boiler inspector, of Iron Horse Water Treatment, Inc. Bill was most helpful in the layout and sizing of the cleanout plugs. His comments and suggestions about operation and maintenance should provide a long life for my new boiler. (I will share those comments in another posting.) What I am suggesting is too gather as much information as you can so you can have a well-conceived and sound design. I purchased the necessary PVQ materials and cutting, drilling and weld joint preparation began. I used the TIG (tungsten inert gas) method for all my weld joints. There is no weld spatter to clean up and you can control the heat of the weld very precisely. After completing the boiler, my son and nephew helped me to do an initial hydro test. The initial hydro test must be twice the calculated maximum operating pressure. My maximum operating pressure will be 150 pounds. Several pin hole leaks showed up as we kept elevating the pressure but we finally got the boiler to hold the required 300 pounds for a prolong period of time. Prior to this hydro test, I did contact our area boiler inspector to see if he wanted to be involved with the process. He said,” call me when you are ready to fire for the first time and I will check it out then”. If all goes well, he will issue a North Carolina “Special” boiler permit. 

The bottom left photo shows the boiler shell sitting in a special fixture mounted to my Kearney & Trecker horizontal milling machine. The bottom right picture up shows a pointed shaft I used to find the centers of the various points of penetration of the boiler shell. The top left picture up is my father and grandson inspecting my work. Note the bar welded across the end of the boiler shell. I used this bar for locating my verticle and horizontal planes as I would rotate the boiler shell for the various machining operations. The top right picture shows the boiler shell and some of the flat plate sections being welded together.


Tuesday, May 12, 2009

The Beginning


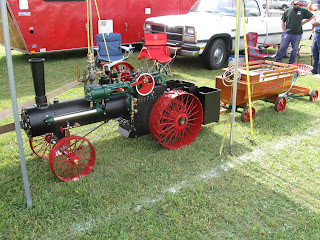
The beginning of building a 1/3 scale CASE started almost 5 years ago after selling the ¼ scale CASE that I had built 10 years prior. Selling the little CASE was probably one of the worst things I have ever done and the beginning of my “great” depression. The posted picture is what I use to play with at steam and tractor shows.


Anyway, upon receiving the blueprints for the 1/3 scale CASE, they looked very familiar. I found a set of blue prints for a Cole Power 2 inch scale CASE that my father had purchased in the late 50’s. Upon comparison, sure enough, the line drawings were exactly the same. The originator of the 4-inch scale CASE had taken Charles Arnold of Tiny Power drawings and copied them and then multiplied all the dimensions by two to come up with a set of drawings for the 4-inch scale traction engine. The original 2-inch scale drawings were dated 11/20/53. So, starting in January of 2004 I began redrawing the 50-year-old drawings. I generated over 200 separate piece part drawings and many assembly and sub-assembly drawings. After about a year and a half I purchased the castings and was ready to rock and roll. I was not very far into the project when it became quit apparent that my drawings and the castings were not matching and I was starting to machine by the seat of my pants. It was also very apparent that the pattern maker had not interrupted the original drawings correctly and major mistakes were made in several castings that caused major problems down the line. I will share later how I resolved those problems. Many of the castings did not line up from side to side. The foundry was way to aggressive in removing the excess material and they wound up grinding away some of the details and/or material that needed to stay with the casting. As pointed out by other model makers, many concessions have to be made in working with model castings. One has to consider alignment issues and establish that all-important datum surface or hole.


Approach to Model Making

Before I go much further with my postings, I want to tell you a little bit about my approach to machining and projects such as the 1/3 CASE. When I started my apprenticeship under my father’s watchful eyes, he encouraged me to watch and listen to the other model makers in the shop. He pointed out that no two-model makers would approach or do a task in the same manner. They may achieve the same end goal, but take different paths to get there. Dad said,” so watch, listen and develop your own style, something that works for you”. What I present may not be your way or the best way in the world to accomplish the task, but what I do is based on what I have learned, the resources I have at hand and what I am comfortable with  So as this blog develops, I hope you can learn a little bit from me as I have learned from so many

I approach scale model engineering in the same manner. I look at others models and try to apply those details that I like to my models. I am not a purist in any sense of the word in my model making. I work towards functionality and aesthetics. I build for my pleasure as an artist paints for himself or herself.  The flip side of the coin, I am always open to constructive criticism. One of my mottos: a closed mind will never learn.

Monday, May 11, 2009

1/3 Scale Model of CASE steam traction Engine


This blog is being generated to share my experiences with you in the fabrication and machining of a 1/3 scale model of a CASE 65 steam traction engine. I have been at this project for many years and have a lot of pictures of my machine tool setups and notes on how to machine and fabricate different component parts of the engine. I plan to share my steaming experiences as well as tips and comments on the proper maintenance and care of a scale model steam engine. I have several other projects in the works that I hope to share with you as time goes by. But for now I will focus on the 1/3 CASE. The picture you see was taken at a tractor show in Goldsboro, NC. I still have the governor  and feed water heater to finish. The gear covers for the water pump and differential need to be started. So please check back often and I am always open to constructive comments.